A how-to video for a beauty technique only helps if viewers can follow it. For that, they need to see every step, in the right order, and see the hands clearly at the tricky parts. This article shows makeup artists, hairstylists and the people filming them how to use a text AI assistant (ChatGPT, Claude, Gemini) to turn a confirmed routine into a shot table, make a long version of about 3 minutes and a short 60-second version, and then check the draft footage.
This is a scripting method, not a promise of high view counts. The rule throughout: the professional decides the routine; AI only splits it into shots and counts seconds. AI must not add techniques on its own, and must not drop a step just because the video needs to be shorter.
A few terms used here
- Prompt: the text you type to the AI; the "Prompt" blocks can be copied.
- Routine: the professional steps in order, confirmed by a trainer or specialist.
- Required step: a step the specialist marks as not to be cut, even in the shortest version. Marked with ★ in this article.
- Shot: one continuous take from one camera angle. A close-up shows only the hands, the tool or the area being worked on; a medium shot shows half the body or the whole head of hair.
- Shot list: a table listing the shots to film, in order.
- Draft shoot: a test shoot on a phone to check camera angles and timing.
- Beauty filter: an effect in the filming app that smooths skin, changes color or makes hair look glossier.
Prepare your source and remove private details
Start from a confirmed routine, not from a line like "write me a script teaching how to braid hair". If you let AI invent the routine, it may write a sequence that sounds reasonable but is not how you teach, or add tips nobody has checked.
Do not paste into the AI: names and photos of clients or students who have not agreed, phone numbers, service prices, or product names you are not allowed to mention. Describe footage in words instead of uploading video. The model must agree to be filmed and posted; see the article personal image usage log.
The example uses a three-strand side braid, because it is simple, uses no chemicals, no heat and no skin contact. This is a sample routine written by the editors for illustration, not a professional standard; use a routine confirmed by your own trainer or specialist. The data set below deliberately contains one contradiction and a draft-footage log with errors so you can test the AI.
SAMPLE ROUTINE (SIMULATED, written by the editors for illustration, not a professional standard)
Skill: three-strand side braid, hair longer than shoulder length.
Routine confirmed by: hair specialist Thanh Vy (fictional).
Tools: wide-tooth comb, fine-tooth comb, black hair elastic, mirror.
S1 Detangle from the ends up to the roots, holding the section above so you do not pull the scalp. Required.
S2 Make a side part and gather all the hair over the right shoulder. Can be combined with S3 in the short version.
S3 Divide the hair into three equal sections, held between the fingers. Required.
S4 Braid: cross the far-right section over the middle, then the far-left section over the middle; repeat, keeping even tension. Required.
S5 Braid to about 5 cm from the ends and wrap the elastic tightly. Required.
S6 Gently loosen the edges of the braid loops if you want a fuller braid. Optional.
S7 Check the result from three angles: front, side, back. Required.
Target length: long version about 3 minutes (180 seconds); short version 60 seconds.
Camera operator's note: the short version can drop S5 because the elastic shot does not look nice.
DRAFT FOOTAGE LOG (SIMULATED)
C1 medium shot, front, introduction, 12 seconds.
C2 brushing, filmed from behind, a desk lamp was switched on so the hair looks more yellow than in other shots, 20 seconds.
C3 dividing into three sections, close-up on hands, 18 seconds.
C4 braiding, close-up on hands, left hand hides the middle section in the first round, 40 seconds.
C5 tying the elastic, filmed as a medium shot, elastic not visible, 10 seconds.
C6 result from the front, smoothing filter on in the filming app, 15 seconds.
Two built-in traps: the camera operator's note wants to drop S5, while the specialist marked S5 as required; and the draft-footage log has three visual errors (color shift from lighting in C2, hand blocking the view in C4, filter in C6) plus one step that is not clearly visible (C5).
Step 1. The specialist finalizes the routine
Before using AI, the specialist writes into the routine which steps are required, which can be combined and which are optional. Wherever it is vague, the AI will decide on its own.
If you are a trainer and want to turn your knowledge into content while keeping your own way of speaking, do the article turning a trainer's knowledge into content in your own voice (in Vietnamese) first, then come back here to build the shooting script.
Step 2. AI splits each step into shots
Open a new chat, paste the simulated data, then paste this prompt:
You are an assistant that writes shooting scripts for professional how-to videos.
Use only the routine I just pasted. Do not add any step, tip, product or technique outside the routine.
Build a table for a long version of about 180 seconds, with these columns:
Step | Shot to film (camera angle, shot size) | Voiceover (max 2 short sentences) | Detail the viewer must see | Seconds.
Rules:
- Keep the exact order S1 to S7.
- Every Required step must have at least one shot.
- Add one Opening row and one Closing row, each max 10 seconds.
- Add up the total seconds at the bottom of the table.
- If the routine and the note disagree, do not choose; list it under the table as Needs specialist decision.
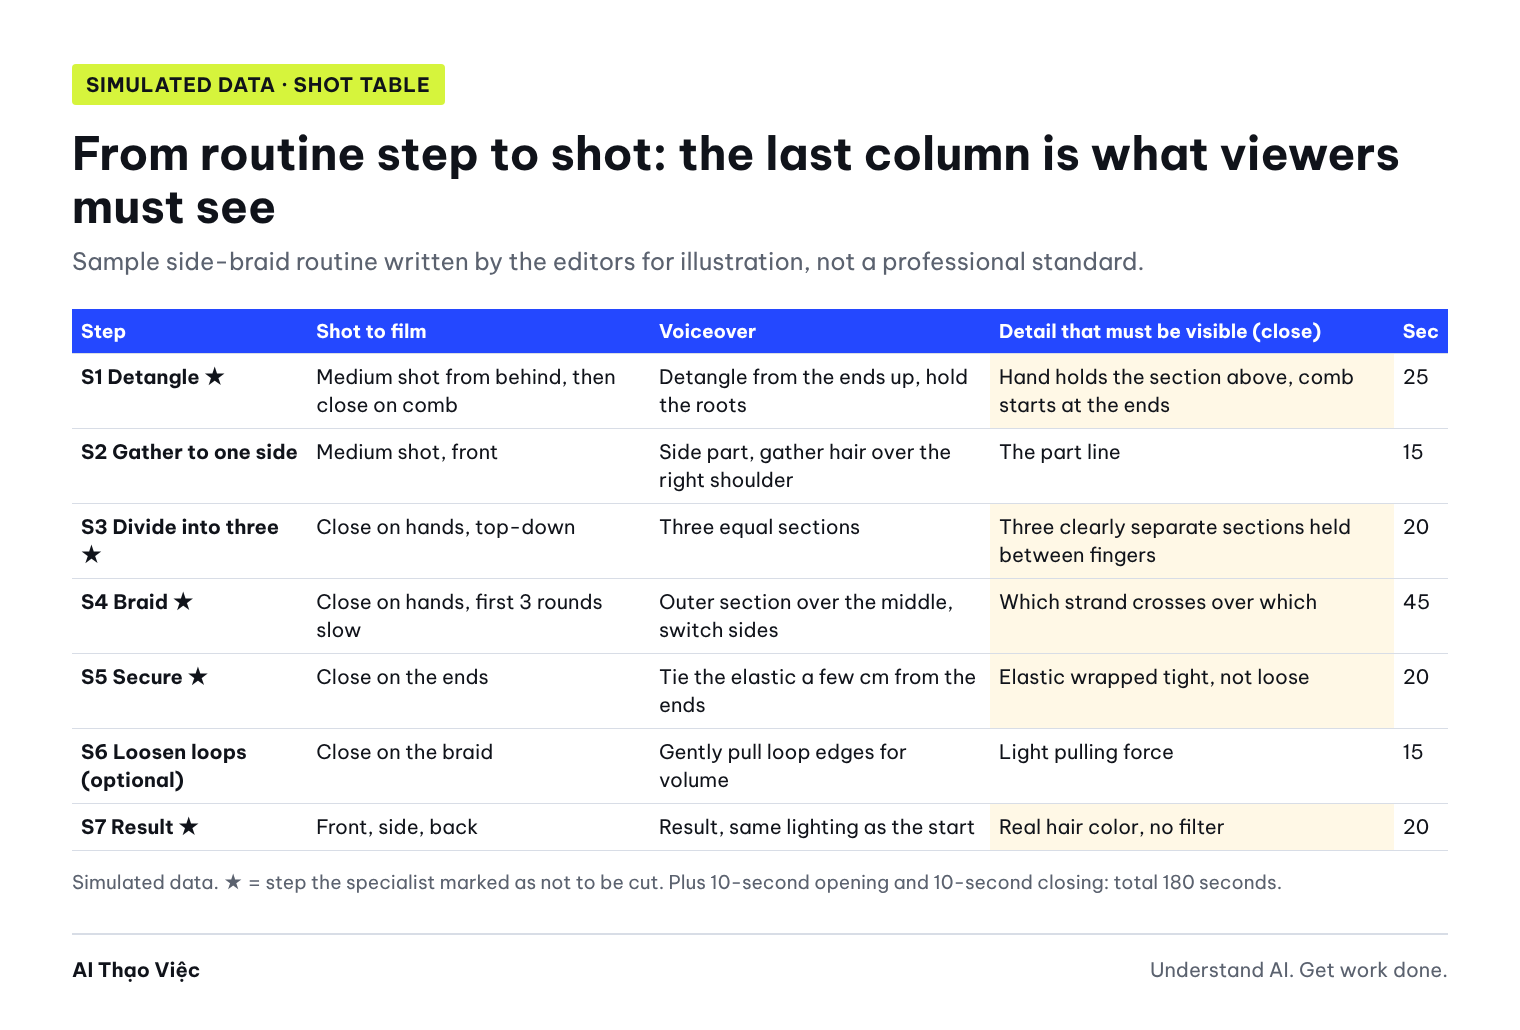
Editorial answer (written by the editors, not run on a real tool): a table like the image above, total 10 + 25 + 15 + 20 + 45 + 20 + 15 + 20 + 10 = 180 seconds. S4 gets the most seconds because that is where viewers most easily go wrong. Under the table there must be a "Needs specialist decision" item saying: the camera operator wants to drop S5, but the routine marks S5 as required.
Step 3. Mark the close-ups you need
Close-ups are for the moments where viewers need to see what the hands are doing: which strand crosses over which, how the elastic wraps. Medium shots show where the work is happening.
For the table you just built:
1. Mark CLOSE on shots where, if filmed from far away, viewers could not follow along. Briefly explain why.
2. For each CLOSE shot, note the suggested camera angle (top-down, shoulder level, from behind) and what the worker's hands might block.
3. Check the order: is any step swapped, combined or missing compared with the routine?
4. Check the timing: is the total exactly 180 seconds; warn about any Required step that has under 8 seconds.
Do not change the content of the steps.
The output passes when S1, S3, S4, S5 and S7 have a close-up or a close enough angle, and S4 has the note "the left hand easily hides the middle section; place the camera top-down or diagonally behind the shoulder". If the AI marks close-ups for all seven steps, ask it to cut back: too many close-ups in a row make viewers lose their bearings.
Step 4. Make a 60-second version without cutting steps
When it hears "cut it down to 60 seconds", AI often drops whole steps. Three correct ways to shorten: less talking (turn voiceover into on-screen text), combine shots (only where the routine allows it), speed up repeated parts (the motion is still visible). Optional steps can be left for the long version.
From the 180-second table, make a 60-second version.
Allowed: less voiceover, turning voiceover into on-screen text, combining steps the routine says can be combined, speeding up repeated motions as long as they stay clearly visible, dropping Optional steps.
Not allowed: dropping any Required step, changing the order, adding tips or products, using a beauty filter on the result shot.
Return a table: Step | How it was shortened | Seconds | On-screen text.
Add up the total. If the Required steps do not fit into 60 seconds, do not cut steps: state how many seconds are missing and suggest narrowing the goal of the video.
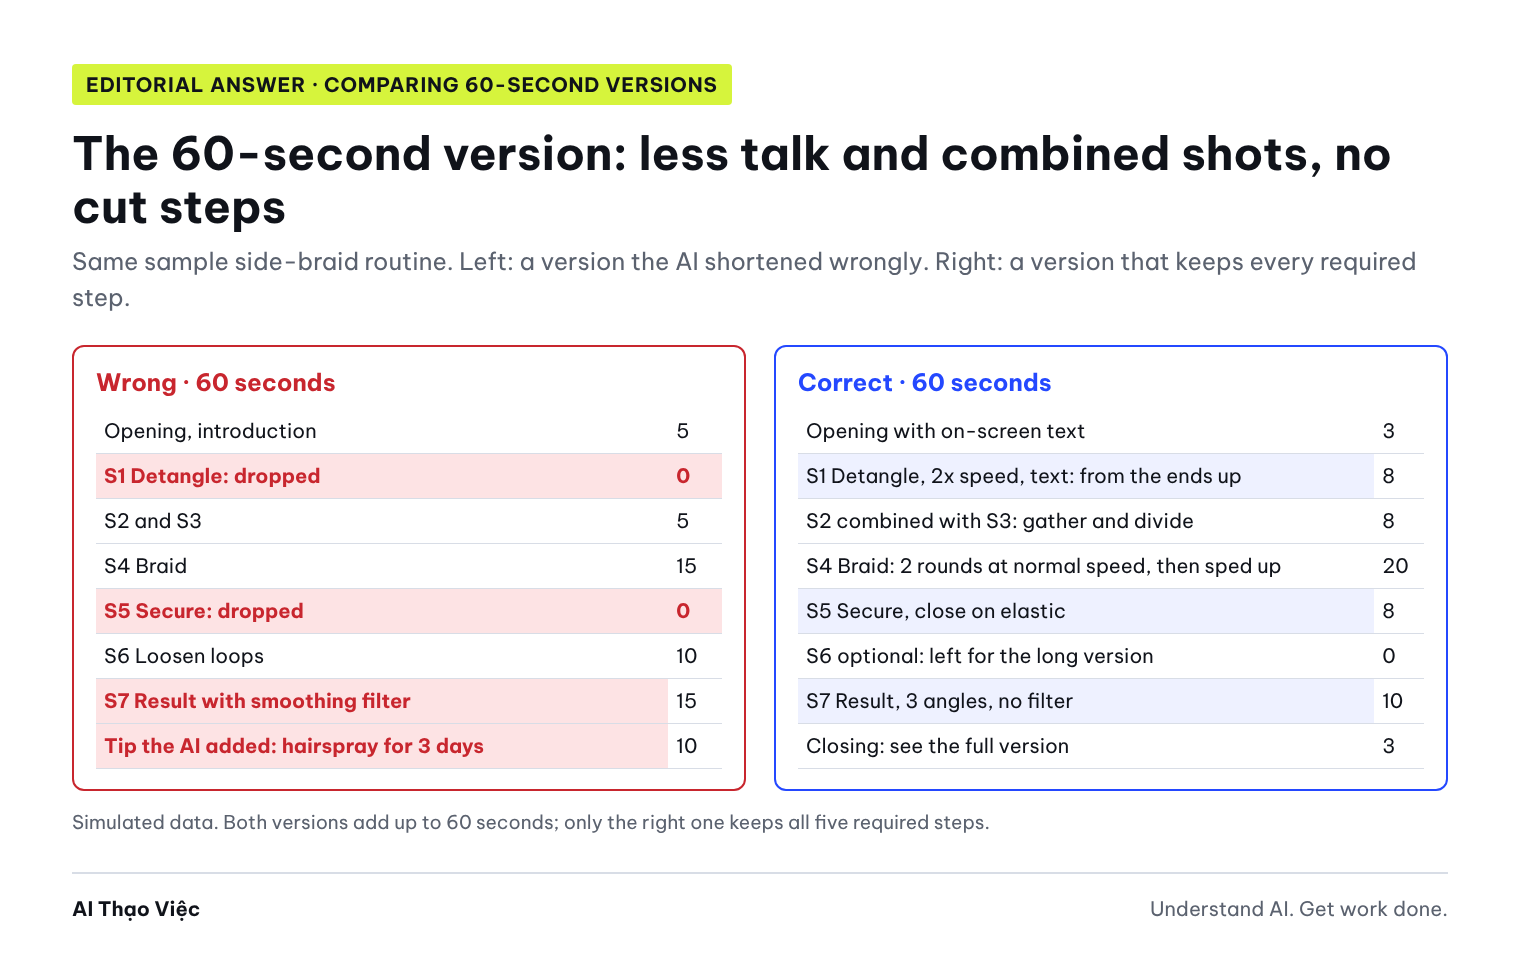
Editorial answer for the correct version (right column of the image): 3 + 8 + 8 + 20 + 8 + 0 + 10 + 3 = 60 seconds. S1 is sped up 2x with the text "brush from the ends up"; S2 is combined with S3 because the routine allows it; S4 keeps two rounds at normal speed so viewers see which strand crosses over which, and the rest is sped up; S6 is left for the long version. The final result shot tells viewers to look for the full version.
If the goal is even shorter, say 30 seconds, do not squeeze the whole braid in. Narrow the goal of the video: one clip that teaches only "divide into three and cross the first two rounds", and say clearly that it is one part of the skill. The article shortening or expanding a skills lesson to fit the time (in Vietnamese) shows how to choose what to keep.
The YouTube help page says Shorts can be up to three minutes long, so the 180-second version can still be posted as a Short. Limits may change; check the platform's help page again on the day you post.
Step 5. Shoot a draft, then the specialist checks it
Shoot a draft following the table, then write a log with one line per shot: what is visible, what is not, lighting, effects. AI only compares text with text; the specialist still watches the video personally.
Compare the draft-footage log with the 180-second table. Return a table:
Draft shot | Step | Detail that must be visible | Does the log say it is visible | Problem | Reshoot needed.
Check:
- Which Required step has no shot, or has a shot where the required detail is not visible.
- Which shot has different lighting or color from the other shots.
- Which shot has a filter or effect that changes the result.
- Which shot is too short compared with the table.
Do not judge the worker's skill. Do not suggest other techniques.
Editorial answer: the AI passes when it points out five places that need a reshoot or an extra shot: C2 light looks yellower than the other shots (turn off the desk lamp, reshoot with the same light source); C4 hand hides the middle section in the first round (change camera angle); C5 elastic not visible (close-up on the ends); C6 smoothing filter on (reshoot without effects); S7 missing side and back angles (shoot extra). S6 also has no shot, but it is optional, so a note is enough.
Spot wrong output
Compare what the AI returns with the original routine, step by step. Errors to catch:
- Dropping steps to fit the time: the 60-second version no longer has S1 detangling or S5 securing, as in the left column of image 2. Viewers who follow it will braid tangled hair, or the braid will come loose right away.
- Following the note instead of the routine: the AI drops S5 because the camera operator said it "does not look nice". When the note and the routine disagree, the AI must ask, not choose.
- Inventing techniques: the AI adds "hairspray to keep the braid perfect for 3 days" or "use wax to set the hair". The routine has no such step, and nobody has checked the "3 days" promise.
- Beautifying the result shot: the AI suggests "turn on a filter so the hair looks glossier" in the result shot. The result must have the same color and lighting as at the start, so viewers can compare it with their own hair.
- Wrong seconds total: the total says 60 but the rows add up to 66. Always add it up yourself.
The 60-second version you just made has errors. Please fix it:
1. Restore every Required step from the routine: S1, S3, S4, S5, S7.
2. Remove every tip, product or technique that is not in the routine.
3. Result shot: no filter, same lighting as the opening shot.
4. Take seconds from voiceover, shots that can be combined and sped-up parts; not from Required steps.
5. For the note that wants to drop S5: put it under Needs specialist decision, do not drop it yourself.
Add up the total seconds again and list every row you changed.
Use it with your own material
- Choose one simple, safe skill; avoid chemicals, high heat, needles or work close to the eyes.
- Write the routine using the template (Required, Can combine, Optional); the trainer or specialist confirms it in a message you can keep.
- Run prompts 1 to 3; the specialist reviews the "detail that must be visible" column and the Required steps in the short version.
- Shoot a draft, run prompt 4, reshoot the shots that need fixing. When editing, use the shot table as the cutting order. The article a 30-second draft clip with CapCut (in Vietnamese) is the next step.
- Reread the captions line by line: the CapCut help page says auto-captions can mishear when there is background music, fast speech or poor audio, and advises editing by hand or turning off the music and generating them again. YouTube Studio lets you add captions by uploading a file, auto-syncing a transcript or typing them manually.
Idea for a workshop or class: each student picks a simple skill (three-strand braid, neat ponytail), writes a 5 to 7 step routine and asks the trainer to mark the required steps. Build the shot table with prompt 1, shoot a 60-second draft, then swap phones with the person next to you and check it with the table from prompt 4.
Check before you use it
- The routine has been confirmed by a trainer or specialist, with the confirmer's name recorded.
- Every Required step has at least one shot in both the long and the short version.
- The shot order matches the routine order; no step is swapped.
- Difficult steps have close-ups, and hands do not block the details that must be visible.
- No tips, products or techniques outside the routine.
- The result shot has the same lighting as the first shot, with no beauty filter.
- You have added up the seconds yourself, and they match the target length.
- Captions have been reread, with tool names and professional terms corrected.
- The model in the video has agreed to be filmed and posted.
- The specialist has watched the final edit, not just the table.
Troubleshooting
- The required steps do not fit the length: narrow the video's goal to one part of the skill, or make two connected clips; do not cut steps.
- The AI keeps adding tips: put the line "Use only the steps in the routine; if you have extra ideas, list them separately at the end as Suggestions for specialist review" at the top of the prompt.
- The camera operator and the specialist disagree about a shot: the specialist decides the professional part (steps, details that must be visible), the camera operator decides the technical part (camera angle, lighting). Write the decision down.
- The result color differs between shots: turn off extra lights that change color, lock white balance on the phone if it has that option, and film all shots in the same time window.
- Auto-captions get terms wrong: fix each line by hand; if there are many errors, turn off the background music, generate the captions again, and only then add the music.
Limits and sources
The braid routine is a sample routine written by the editors for illustration, not a professional standard; the people, footage log and seconds are simulated. The answers were written by the editors, not run on a real AI tool, and no real video was shot.
- YouTube Help, Understand three-minute YouTube Shorts: Shorts can be up to three minutes long. Checked 31 Oct 2026.
- YouTube Help, Add subtitles and captions: add captions by uploading a file, auto-syncing a transcript or typing manually. Checked 31 Oct 2026.
- CapCut Help, How do I fix inaccurate auto-captions in CapCut?: auto-captions can mishear; how to fix them by hand and regenerate them. Checked 31 Oct 2026.
Read next: the step before is turning a trainer's knowledge into content in your own voice (in Vietnamese); the step after is a 30-second draft clip with CapCut (in Vietnamese). If you teach, see also writing practice sheets with AI; if the video is filmed during a photoshoot, see preparing a beauty photoshoot.